Thursday, February 28, 2013

Keep Calm.....

I hate to admit it, but this is one of the first hostess sets that I got---and never used until now!  Has anyone else done this??  So I broke it in with this card for an upcoming birthday in our family.  

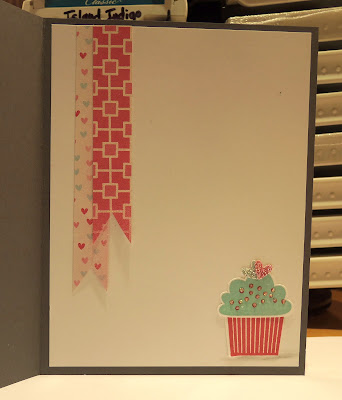
The card base is basic gray with an embossed pool party layer.  I'm still trying to find uses for my More Amore paper past Valentine's Day....I embossed the Keep Calm sentiment with Melon Mambo embossing powder.  The little cupcake on the left is also embossed--it is from the stamp set "Itty Bitty Bits."  You can't see it, but I've used Dazzling Details on the cupcake top.  Here's the inside of the card:


The cupcake bottom and top are stamped and punched out.  I've added two glitter hearts to the top (from the Owl builder punch).  


Wednesday, February 27, 2013

Catalog CASE

I've loved the card on page 79 since the catalog came out--I even bought the Fine Feathers stamp set to make it!  Of course I had to go to stampinup.com's catalog page to look under the supplies to figure out what I needed to make it--especially the card front that looks whitewashed.  I had all my supplies set out and was ready to create--except I couldn't find my faceted buttons.....still can't find them....oh where oh where can they be??  So I improvised....a teensy weensy bit.  Here's the card:

So how did I create the background on the card front?  It was very easy actually--just sponge craft white ink over the top of my Not Quite Navy cardstock--really looks cool!

Tuesday, February 26, 2013

6 Day Weekend....

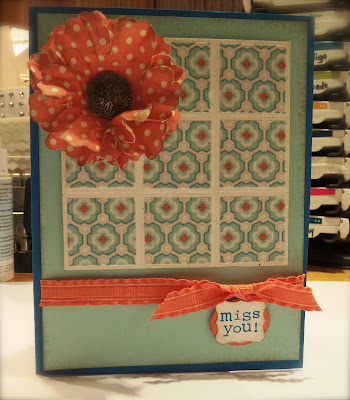
I'm on my fourth snow day and have enough cards made to share 1 a day for the next 2+ weeks!  =-)  I guess that's one way to get ahead!  Here's a cute card that I made that uses the "tile technique."  I found the directions here on Frenchie's blog.  The background that I made uses dsp--just pick one that looks a bit like floor tiling.  After it's laid out you emboss the whole thing with clear embossing powder.  Although you can't tell it in the picture it does look a lot like a tiled floor or wall!  Be sure to watch Frenchie's video here to get the measurements and steps to make this.  Here's my card:


I use the SAB designer paper Sycamore Street that you can get free with a $50 order--it has a number of designs that look like tiles.  The flower is made from 3 blossom punch flowers from another dsp-- attached together with an Antique brad and then crumpled and sponged with Crumb Cake ink.  The sentiment is from "Up in the Air" punched out with the new mini curly label punch--another Sale-a-Bration offering.  It's layered on a calypso coral small oval.  Colors used are Pacific Point, Pool Party and Whisper White.


Something New from Stampin' Up


Introducing Stampin' Up Online Classes!

The Basics

PERFECT FOR THE BUSY STAMPER!  Learn innovative ways to get the most out of your Stampin' Up! supplies (from stamps to the Big Shot) with clever tips and all the techniques you need to start creating with success.  Divided into six sections focused on a variety of topics, Stampin' Up! on-line classes include videos, step outs, and supply lists for 30+ projects. Only $14.95!

THESE ARE DOWNLOADABLE ZIP FILES.  YOU DO NOT NEED MY DIGITAL STUDIO TO TAKE ADVANTAGE OF THE CLASS!  After purchasing and downloading the class, open "Stampin' Class--The Basics" folder and there will be 6 individual "sessions" folders inside.  Click on each and enjoy!
PC InstructionsThe files will be downloaded as archive files that you can then extract and save on your computer. When you click on the download link, an extraction program will automatically launch. Choose the location where you would like to save the files (be sure to note where you save them). Follow the prompts on the extraction program, then navigate to the location where you saved the files. Click on the file and open.
Mac Instructions
When you click on the download link, the file will be mounted as a drive. Once it is mounted, open the drive and drag and drop the files to the location of your choice on your hard drive. The files can then be opened.
Well, I'm off to purchase this and see what it's like--I'll let you know!  You can order yours here!
*If you do purchase this class (When downloading, select "For other applications" rather than "For My Digital Studio.")

Monday, February 25, 2013

Snow Day = Stamp Day....

I'm on the verge of my 3rd straight snow day--with a weekend in between.  I have a lot of things that I SHOULD be doing, but my stamp room has been calling my name lately!  I made around 12 cards yesterday and am working on my swaps for the St. Louis Regional coming up in a little less than a month!  Here's one of the cards I made yesterday.....


The stamp is from the Petite Pairs set.  The doily is the largest on the Delicate Doilies sizzlet.  I made my kiss from the Blossom Builder punch, stamped it with versamark and embossed it with clear embossing powder to give it that "chocolate shine" and then wrapped a bit of foil around the bottom.  The love tag is a bit of cardstock vellum with the love from Lovely Little Labels.  I used non SU embossing folder that I got as a gift awhile back and some retired pretty in pink taffeta ribbon.  I've always liked the way pink pirouette and chocolate chip look together.  As always you can order online here or get in touch with me to schedule a party!

Thursday, February 21, 2013

SU Party Fun--it's a Sale-a-Bration!

Last night was our monthly get together for stamping fun!  We had a great time, lots of fun conversation and some great food!  Thanks Debbie for being a great hostess!  Here are the cards I demonstrated last night and also our make and take. One of these days I'm going to remember to take my camera with me and catch us all having fun!


This is a card that I cased from Inking Idaho--it uses the chalkboard technique!  Really love the Hearts a Flutter framelits and matching stamp set for the banners.  I used the new flower trim.  I just tapped it with ink and a sponge dauber to change it to a primrose petal colored flower.  The sentiment is the stamp that comes with the pop up posies pack in the Spring catalog.


This card uses the Oh, Hello set from the spring catty along with Loving Thoughts from the main catalog.  I used the Flower Trim again, but this time dyed the flowers with water and 8 - 10 drops of reinker.  The card I cased this from had the same set up, but I haven't bought the doilies so I trimmed my new oval framelit cut out with the finishing touches edgelit from the main catalog.  


Sorry for the shadow on this photo--just couldn't get a good shot of it!  This uses all Sale-a-Bration items except for the Baker's twine and brads.  The SAB stamp set is called Pretty Petites and the matching punch is also a SAB item.  I cased this card from Heather Klump's blog Downstairs Designs.


Here's a card I created using the Pop Up Posies Kit from the spring catalog.  I also used the From the Heart set that's found in the main catalog.  Some Tea for Two designer paper and crochet trim with an antique brad finish this off.  Here's the inside of the card.

The inside sentiment is "From the Heart."


This was our make and take.  I cased this from Dawn Olchefske.  It's a simple card using the Peek a Boo bigz die.  The stamp set we used was from SAB--Patterned Occasions.  The little elephant is hiding under my flap.  The dsp is More Amore.


Well I'm off to my stamp room to put stuff away and create some cards!