On top of the color change that's coming with the next catalog for Stampin' Up...
.... we have a new group of "in-colors"--I'm reading my demonstrator magazine "Stampin' Success" and I'm looking at a cute card and reading the list of things used to make it and here are the color names that I read......
Coastal Cabana--light aqua bluish color
Pistachio Pudding--light green
Baked Brown Sugar---looks like a darker crumb cake
Strawberry Slush--looks like a pinky red??
Crisp Cantaloupe--light orange/coralish
Andy there you have it! They are actually very pretty, ice-creamish shaded colors. Can't wait to see them in real life!
On another note--I got my 2nd Paper Pumpkin kit today--seriously! (that's a joke you'll get when you see the kit) I'll get some pictures taken as soon as I can--right now I'm moving stuff around--I bought some used office furniture and am getting it moved in this afternoon--so all my stuff is piled on a table.
Sunday, April 21, 2013
Thursday, April 18, 2013
Stamping Party Fun!
One of these days I'm going to remember to get my camera out and take pictures of us at our stamping party! We had a great time Tuesday night--talking, laughing and creating together! The time we spend together is one of my highlights each month! Last night's party was a bit of a stretch for me--due to an unexpected Dr. appointment in Kansas City I was not able to make examples of all the cards I demonstrated ahead of time.....so it was a bit of an adventure!
Before I show you the cards I just want to say that I'm in love with the ideas on Julie Davison's blog right now! I wish I had a 10th of her creativity, but I don't so I cased several--(maybe more) ideas from her for this month's party. I haven't had time to go back too far on her site, but everything I've seen --- I LOVE! Please take the time to check it out here-- Julie's Stamping Spot. I'll direct you to the exact post for cards that I did case under each card--the link above will take you to her home page.
Here are the cards I demonstrated last night:
I started off with 2 five minute (or less) cards. I've already posted one of them here, but I'll put up a picture again--I also made matching envelopes for each of the cards. The first uses the new Washi Tape that comes in the "This and That" bundle, but is also available separately. I didn't know what all the fuss was about this stuff, but it's fun and easy to work with! I cased it from Julie here.
The second card used the thumping (with a Regal Rose marker) technique after the stamp was inked up with Pink Pirouette. The sentiment is stamped with Basic Gray. I really do love the delicate quality this gives the flower in the Blooming with Kindness set. You can't tell from the photo, but I added a couple of spritzes of my champagne mist spray (mixed with rubbing alcohol) to give the card some glimmer.
Then I made a card also cased from Julie, here, that uses the bottle caps from the spring catalog as the focal point. It uses Patio Party dsp, midnight muse, primrose petals, summer starfruit and crumb cake. The center of the bottle cap is punched with a 1" punch and uses the banner from Collage Curios and sentiment from Pennant Parade.
Before I show you the cards I just want to say that I'm in love with the ideas on Julie Davison's blog right now! I wish I had a 10th of her creativity, but I don't so I cased several--(maybe more) ideas from her for this month's party. I haven't had time to go back too far on her site, but everything I've seen --- I LOVE! Please take the time to check it out here-- Julie's Stamping Spot. I'll direct you to the exact post for cards that I did case under each card--the link above will take you to her home page.
Here are the cards I demonstrated last night:
I started off with 2 five minute (or less) cards. I've already posted one of them here, but I'll put up a picture again--I also made matching envelopes for each of the cards. The first uses the new Washi Tape that comes in the "This and That" bundle, but is also available separately. I didn't know what all the fuss was about this stuff, but it's fun and easy to work with! I cased it from Julie here.
The second card used the thumping (with a Regal Rose marker) technique after the stamp was inked up with Pink Pirouette. The sentiment is stamped with Basic Gray. I really do love the delicate quality this gives the flower in the Blooming with Kindness set. You can't tell from the photo, but I added a couple of spritzes of my champagne mist spray (mixed with rubbing alcohol) to give the card some glimmer.
Then I made a card also cased from Julie, here, that uses the bottle caps from the spring catalog as the focal point. It uses Patio Party dsp, midnight muse, primrose petals, summer starfruit and crumb cake. The center of the bottle cap is punched with a 1" punch and uses the banner from Collage Curios and sentiment from Pennant Parade.
Then I did a couple of cards using the big butterfly stamp, Swallowtail. The first card followed the directions in the Spring catalog to emboss and then use the champagne mist glimmer paint. No picture-my card turned out UGLY! =-) It might have been the fact that I didn't have the pool party embossing powder....I will say the glimmer was lovely and I will try it again.
The second Swallowtail card turned out great! I cased it from Brenda Quintana, here. You stamp the butterfly with versamark and emboss with the early espresso embossing powder on Island Indigo cardstock. Then using a Q-tip paint it with bleach--easy and impressive! The sentiment is from the first Paper Pumpkin kit.
Finally I showed how to make a "spinner card" following Dawn Olchefske's tutorial here and caseing Lori Heilling's design. I think when I redo it and I'll move the sentiments a bit, but it is cute! It uses the Henry Says stamp set from the spring catalog stamped on Polka Dot Parade and then cut out. I used a scrap of Summer Smooches dsp and the pinwheel sizzlet for the pinwheel. The sentiment is from Wishes Your Way.
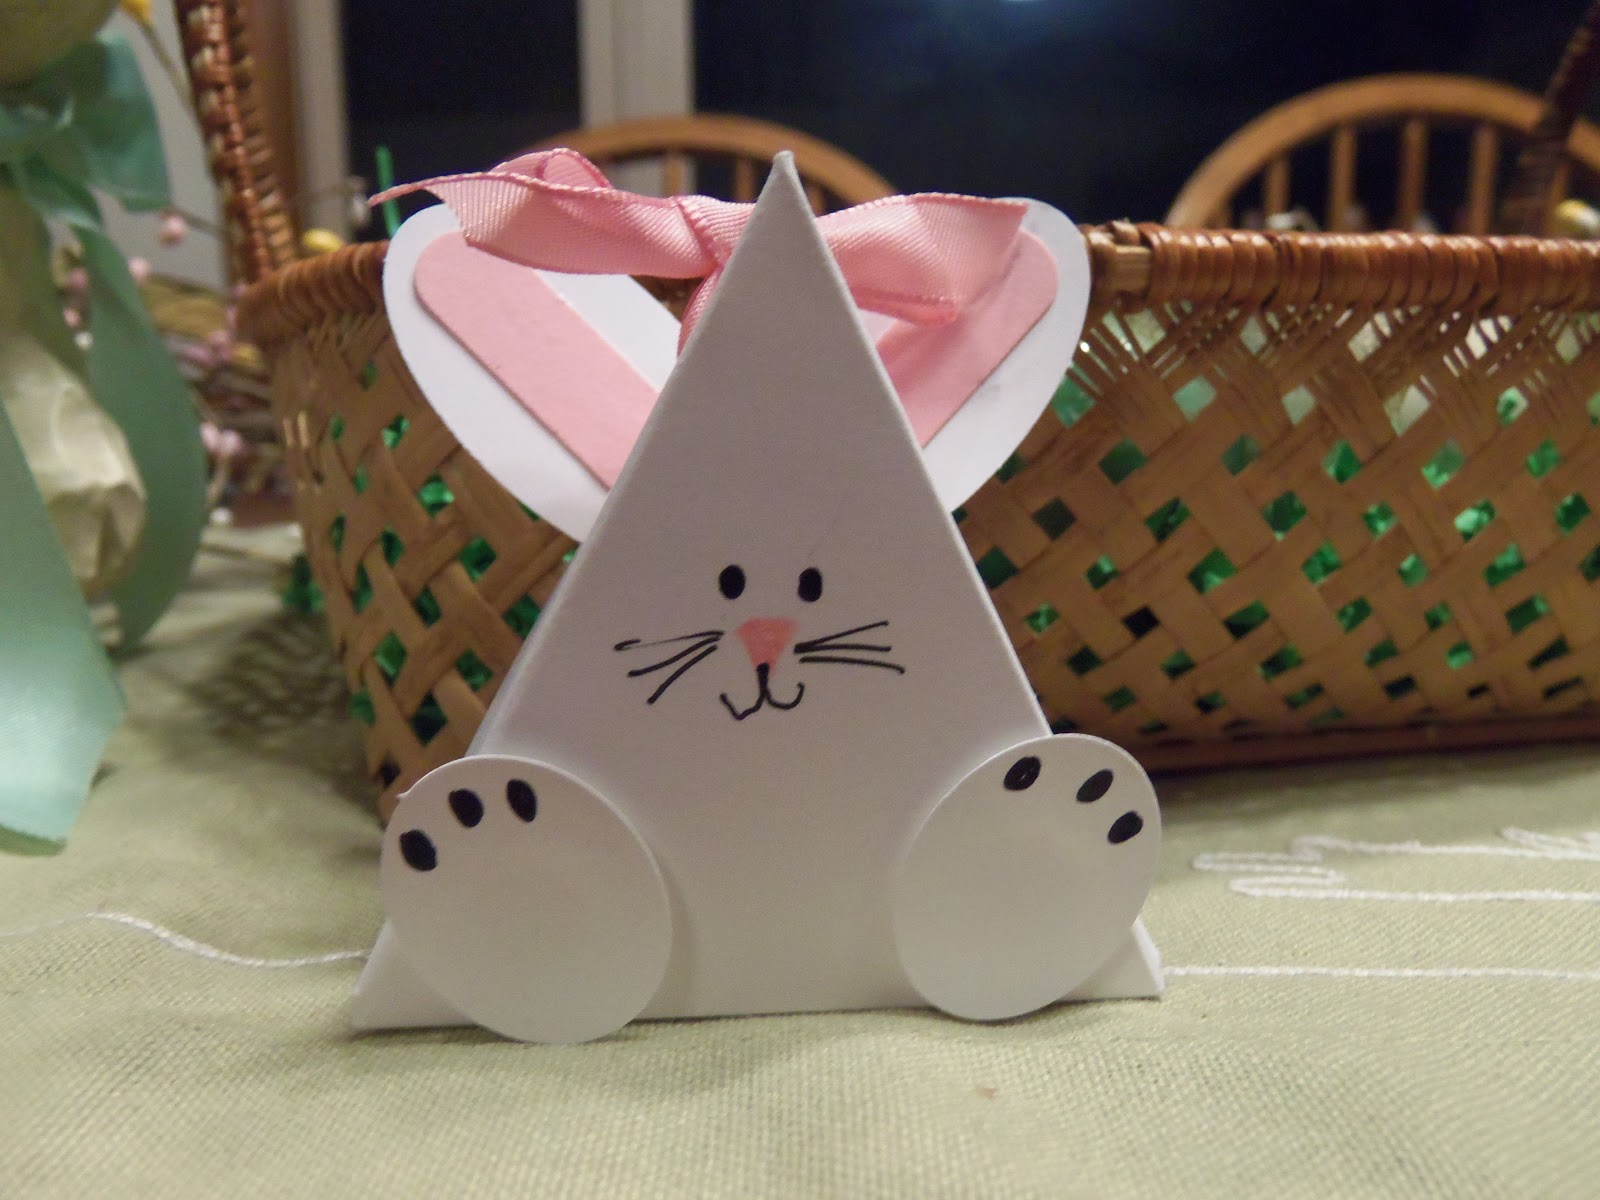
Our make and takes were a tag using the washi tape and a triangular elephant box--both cased from Julie! You should check out all of her different animals and she has a great video tutorial on how to make the bunny. Here's the link for the tag--taken from one of her cards.
The flame is from the ornament punch pack in the fall/winter catalog.
The best part of this project were all the different ways the ears were put on and the face was made--loved them all! Here's the link--and there is a link to the video of how to make the basic triangle box in Julie's post.
So ends my loooooong post---it was a fun night!
Friday, March 29, 2013
Easter Fun!
My niece is a Pampered Chef consultant--and back when she was getting started I agreed to have a party for her if she would have one for me! =-) Her sister, who lives in Iowa, is a stamping fan so she wanted to have the party when she was here in Kansas.....so yesterday we planned a party for ....today. I planned more than usual for us to do (than a typical party) since it was family.....mostly. We had my SIL, 2 nieces and 2 of their friends with daughters stamping with us--and it was great fun. Of course I have fun just about any time that I stamp! Here's what we made:
1. This CAS card designed by Mary Brown at stampercamper.com that uses one of my favorite sets from the catalog Blooming with Kindness
You stamp the flower in Pink Pirouette and then using a Regal Rose marker (brush end) you tap it on the stamp --a technique called thumping. It really adds a depth to the flower that is quite lovely.
2. We made this card using Fabulous Florets, the Top Note die and Vintage Wallpaper embossing folder--in Daffodil Delight and Basic Gray.
Make sure you stamp off once for the Daffodil Delight flowers--otherwise they are a bit dark (take notice on my top right where I forgot). This card was totally cased from a swap that I received at regionals in St. Louis last weekend, but I can't give credit since there was no name on it.
3. This card which was pretty much cased from Dawn Olchefske. I had the card fronts already embossed from what I thought was going to be a swap at regionals and then I changed my mind, so I was glad to get some of them used.
You can sort of see the Iridescent Ice embossing powder on the bunny picture. It's very sparkly. We used watercolor wonder crayons and blender pens to color.
And finally.....4. This adorable bunny box (my face is a bit wonky--I'm blaming the marker). Go here and see Julie's video and all of the different animals she's made out of the triangle box. Cute, cute, cute!
The video was made about a week before all the other animals appeared so be sure to check out her other posts!
Here's his cute little bunny tail...don't know where the pink smudge came from--probably my sponge dauber from the other card.
These are small--they would only hold maybe 2 kisses--or one piece of longer candy--like a taffy.
I'm off to bed--my IU Hoosiers lost last night and now the Jayhawks lost tonight--it's a sad day in my house--now I have only Wichita State to root for! Go Shockers!
Wednesday, March 27, 2013
St. Louis Regional "Stuff"
One of the best parts of the St. Louis regional--besides meeting other stampers that are as passionate about stamping as you are and all the swapping---are the projects that are brought for you to do during the make and take time!
We made a cute card using some different techniques than I've used before and a covered notepad. Of course I'd already taken 6 pages or so of notes in it before I realized it was a part of the project we were doing! Ha!
Here are pictures of both--they aren't perfect--that's for sure! I didn't do a good job of following directions on the card, but it still turned out cute! And my notebook has a smeared sentiment....tried twice, but I was in a bit of a hurry to finish up! They were giving us the countdown! =-)
We made a cute card using some different techniques than I've used before and a covered notepad. Of course I'd already taken 6 pages or so of notes in it before I realized it was a part of the project we were doing! Ha!
Here are pictures of both--they aren't perfect--that's for sure! I didn't do a good job of following directions on the card, but it still turned out cute! And my notebook has a smeared sentiment....tried twice, but I was in a bit of a hurry to finish up! They were giving us the countdown! =-)
We had one more project, but I didn't get it put together yet--it wouldn't travel well. The best part (oh wait, I already said that) is I just bought this set--Clockworks!
Tuesday, March 26, 2013
Let's Swap!
So, there was a spring snowstorm that moved through the midwest yesterday and today. I was in St. Louis at the SU Regional calling home to see what I should do--I really didn't want to drive 7+ hours after being at the regional for much of the day. My husband told me to stay put so I did--I ate hotel food and watched basketball...and most of all watched the weather. I woke up early this morning, checked the computer for road conditions, turned on the news and decided to get out of there while I could--they were supposed to get 8 - 12 " today. Driving through Missouri was miserable--I slid around trying to get to a gas station and had to trudge through 10" of snow to get to a bathroom at a rest area----but it was all worth it!
Here are the swaps that I took to the regional event--I'd made about 25 of each. They are card fronts--not complete cards.
This uses Blooming with Kindness and the butterfly punch with cardstock vellum.
Here are the swaps that I took to the regional event--I'd made about 25 of each. They are card fronts--not complete cards.
This uses Blooming with Kindness and the butterfly punch with cardstock vellum.
The 1 3/8" circle punch and a variety of Thanks/Thank you stamps. Very simple, but striking!
This is probably my favorite--the puppy is made from the heart framelits. The eye heart is from the owl builder punch and the tongue is the small oval punch. The puppy actually opens up and stamped inside is the "Arf Bark Aroof" from the Animal Talk stamp set.
Here's the pile of swaps I received in exchange:
Sorry--tried to post this yesterday (Monday), but my internet suddenly wasn't there.
Saturday, March 23, 2013
Gone Stamping!
Oops! I sort of bailed out on you all! Here is the card that I mentioned that I was going to post in my last entry.
I saw a card using the little hearts from the SAB set Patterned Occasion's little band-aid and had to try it--but something was missing so I added a piece of black cardstock under the whisper white, but I'm still not sure about it.....I'll post that picture when I get back home and get it taken! =-)
That leads me to where I've been and what I've been doing!
I spent the last 2 weeks making swaps--80 of them, enjoying time with my grandchildren (thanks Matt and Abby for coming with them) and watching basketball.
Now.....
I am sitting in my motel room after my first Stampin' Up event--a regional in St. Louis! Wow! My brain is full of ideas and my bed is full of wonderful swaps! I got a lot of great ideas and learned about some fabulous techniques that I can't wait to share! Here are a few pictures of what went on today!
I arrived at the America's Center a bit early since I wasn't sure how long it would take me to get from my motel to the center and then parked etc... Fortunately, I'd been at this convention center last summer for my church's Annual Conference so I was a bit familiar with the territory and where the parking garages were. Anyway--I got there about 7:25--registration didn't start until 8 a.m. and the regional didn't begin until 9. People were everywhere! A lot of swapping was going on--I had all 80 of my cards swapped before the regional even began! Here's our convention room taken from the back:
All the scoreboards on the tables were for the projects that we did in the morning.
I sat at a table with some lovely women from Iowa. Let me tell you--the doors opened and people were in the room with tables staked out for their groups--then a lot were up and cruising around the room to swap cards. Here's the table I was at with Julie's swaps laying on the table. I also took a picture of the cute lapel flowers that she made for all of her downline.
Here's Sharron's flower up close. The center is made of a smashed pop top. I'll be back tomorrow with the picture of the So many Smiles with the black cardstock behind the white and some more regional pictures.
Thursday, March 7, 2013
Blooming with Kindness....again!
I really like this set and its sentiments....I tried out my new punch mat with this card. Really like having it be the length of the card and not having to move it like you used to have to do with the smaller mat.
If I did this again I'd try with different colors....it just seems blah to me. I'll be back tomorrow to show you a before and after card--how adding an extra layer can help pop your card front!
Subscribe to:
Posts (Atom)